
Spring is so busy and summer is too hot, so it seems that fall is the time I tend to tackle big garden projects.
The work on this newest project actually began over a year ago. A temporary shed had finally been removed leaving behind a scruffy area of lawn and a row of rather bedraggled looking cedars. After the ugly cedars were cut down, I was left with a fairly blank slate. I could do just about anything I wanted to do.
The area in question was not without its challenges. For starters, the soil ranged from poor to heavy clay. Light levels were a diverse mix of conditions. Within a matter of a few feet, the amount of sunlight could shift from full sun to full shade. Most of our backyard is flat and even, but this one section of the yard slopes down as much as a foot.
I started with the soil, which is where all garden planning must really begin. The horrible clay soil was amended to allow better drainage. Rich black topsoil was added to improve the quality of the poor soil and raise the grade up to be level the rest of the yard. While I can describe this work in two quick sentences, the task took all of my spare time last fall.
The area I am describing is a large space that includes what will eventually be a stream with a wooden bridge, a small pond, a generous flowerbed and a small courtyard with a wooden bench. To keep this post a manageable length, I am going to focus in on one small part of the larger project– the circular courtyard of thyme with the wooden bench.

The starting point for this courtyard was a concrete column with Celtic-inspired ornamentation. I bought the column on clearance a few years back with no particular use in mind, but confident that I would eventually find a place for it in the garden. When I came across the sundial at a home goods store, I knew it was the perfect topper for the Celtic column.
A sundial is basically a primitive clock that tells the time of day based on the position of the sun. An armillary sundial, like the one I have, has a fixed rod or gnomon (in this case an arrow) that represents the polar axis of the sky as seen from Earth.
My inexpensive sundial is more decorative than anything else, and one of the round sphere's is broken, so I am putting a proper replacement high on my wishlist for Christmas.

Geranium 'Rozanne' is one of the many hardy geraniums that I added to this part of the garden.

Most hardy geraniums bloom in June, but Geranium 'Rozanne' blooms much later. Come late summer and fall, you'll be so glad you planted it!

Creeping Thyme
Plants inspired me as well. On the part-shade/shade fringes of my courtyard, I decided to feature hardy geraniums as an alternative to commonly used shade plants like hosta (more on the hardy geraniums another time).
For the courtyard itself, I wanted to lay down a ground covering of thyme. Thyme is one of those plants that can take a fair amount of foot traffic. Creating a steppable lawn of thyme is something I have dreamed about making for years. Until now I didn't have a sunny spot available.
Thyme is a Mediterranean herb that likes full sun and hot, dry conditions. It can be a bit of a challenge to get it to overwinter here in Southern Ontario. The last thing thyme likes are freezing temperatures and soggy clay soil!
To improve its odds for survival you need to provide thyme with really sharp drainage. The soil in my little courtyard was horrible grey clay. To improve the drainage, I dug out the top 6-8 inches of clay. Then I mixed into the remaining soil bags of fine gravel and sand. Hopefully, that will do the trick of improving the drainage!

The garden at sunset in September 2018.
A circular courtyard with a sundial at its centre fits in perfectly with the rest of the garden's design.
Circles a recurring element. There is a round seating area in the middle of the garden. When you walk further down the central path and pass through the wooden arbour, there is a large circular garden with an urn at its centre.
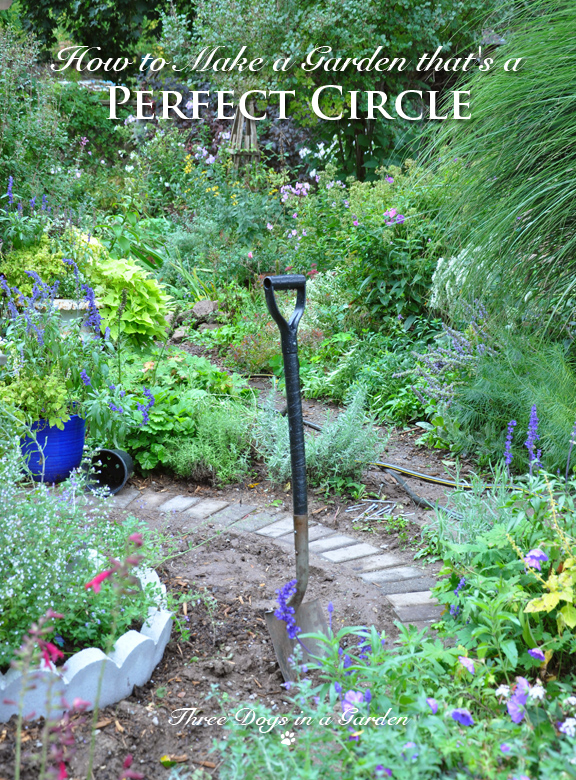
How to Make a Garden that's a Perfect Circle
The first step in making a circular garden is deciding where you want the centre of your circle. The centre can be quite arbitrary based on whatever is pleasing or it could be based on preexisting elements in the garden's design.

I already had flowerbeds, a bench and a central pathway in place. We used a tape measure to determine the midway point between the bench on one side and the flowerbed on the other. Then we found the centre point between the outside edge of the pathway (seen on the righthand side of the photo) and a flowerbed on the opposite side. The intersection of those two measurements gave us the centre of what would be my circle.

Once you find the centre, you can start to map out the outline of your circle. A simple measuring device makes the job easy.
Using a rubber mallet place a rounded, verticle pole at the centre point of your circle. The pole could be anything handy; a wooden dowel or even a broomstick handle. Attach a length of rope to your pole (Note: choose a rope that will not easily stretch). Pull the rope out until it reaches the outside edge of your circle. Tie a 6-inch galvanized spike to end of the rope.
Swivel your rope around the pole marking the stops around the circumference of the circle with galvanized spikes. As a demonstration, I have marked out part of a circle (seen above).

Once the galvanized spikes are placed around the circumference of the circle, you will have a pretty clear guide, but tieing and then wrapping some twine around each of the spikes will make the outline even more distinct.

I knew I would be working on this project over a couple of weeks, so I decided to use an old rubber hose to mark the perimeter of my circle.

I am by no means an expert at laying brick. There is probably a hardscaping professional out there that will cringe upon seeing my DIY methods. I'll tell you what I did to lay down my circle of bricks, but this is in no way a tutorial!
With an edger, I dug in to mark the outer edge of my circle. Then I widened it into a trench that was big enough to accommodate my bricks. When the trench was finished, I levelled and compacted the soil. Then I added sand, compacted and levelled it. When I was happy with my work, I laid the brick and firmed it down with a rubber mallet. The final step was to fill the cracks between the bricks with sand.
Getting the sand flat and even took the vast majority of my time. That being said, things progressed fairly quickly.

To compliment sundial and play up the celestial theme even further, I decided to create a stylized sun with a circle of precast edging and radiating lines of bricks (you can easily find this scalloped edging at Rona, Lowes or Home Depot).

The bricks mimicking the rays of the sun were by far the fiddliest part of this job. With my husband's help, I laid out my pattern of bricks (we eye-balled the placement of the bricks rather than doing any measurements).
Once the bricks were laid out, I used one of the galvanized spikes to trace the brick's outline in the dirt. Using that outline as my guide, I dug a trench. The rocky ground was levelled and compacted. Sand was added, levelled and compacted as well. Finally, the bricks went in and the gaps were filled with sand.

So far there is just a smattering of Creeping Thyme planted in the gravelly soil. I will add lots more thyme next spring. Hopefully, all the hard work I did to improve the soil's drainage will pay off and it will spread quickly to create a dense lawn-like groundcover.
I should also make mention the plantings at the base of the sundial. Presently I have a mix of Calamintha and Russian Sage. The sage was a dwarf variety, but it's quickly proven to be too big for such a small area. In the spring, I will move the sage to a new spot in the garden and replace it with one of two varieties of blue Catmint.

Dwarf Calamint, Calamintha nepeta ssp. nepta: has arching sprays of pale mauve-blue flowers. The foliage of this plant has a minty fragrance. Full sun or light shade. It tolerates average, dry and moist growing conditions and is suitable for normal, sandy or clay soils. Bees love it! Height: 20-30 cm, Spread 30-45 cm Hardy USDA Zones 4-9.

I will probably go with one of these two:
Blue Catmint, Nepeta racemosa 'Walker's Low' is a long blooming perennial that has a mounded, bushy habit. It has grey-green foliage and blue flowers. Full sun. Height: 60-90 cm (23-35 inches), Spread: 75-90 cm ( 29-35 inches). USDA Zones: 3-9.
Nepeta x faassenii 'Blue Wonder' is a bit more compact. Height: 30-45 cm (12-18 inches), Spread: 38-45 cm (15-18 inches). USDA Zones 3-9.

Despite the fact that the thyme is really patchy, but I am rather pleased with the way the whole thing came together.

When you walk over the bridge and into my garden, it surrounds and envelopes you and I love that!
You may be wondering about the very pretty plant on the righthand side of my picture (above). It is Eupatorium rugosum 'Chocolate'.
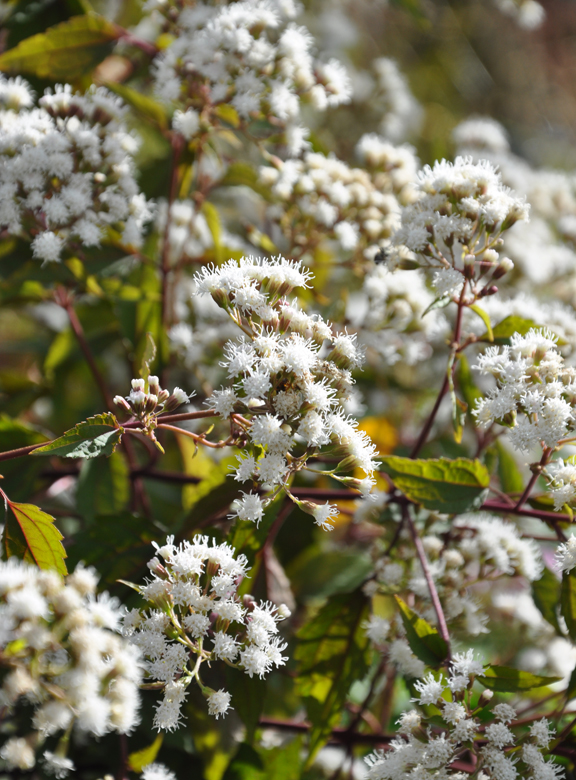
Eupatorium rugosum 'Chocolate' has really attractive maroon-brown foliage in the spring. The tops of the leaves turn olive-green as the summer progresses, but the undersides of the leaves the plant's stems remain a nice contrasting shade of chocolate throughout the gardening season. In full sun, 'Chocolate' needs moist soil. In part-shade, it will tolerate somewhat drier conditions but it still prefers regular water. 'Chocolate' has flat clusters of starry white flowers in late summer/fall. It is important to deadhead the flowers to avoid self-seeding. 'Chocolate' will not come true from seed. Deer resistant. Height: 90-120 cm (35-47 inches), Spread: 75-90 cm (29-35 inches). USDA zones: 5-9.


A new grey bench replaces an old white one that you may remember seeing in previous pictures (We found it on clearance at Lowes).
My husband made the tall wooden obelisk beside the bench. Eventually, I hope it will be smothered in the blooms of a Clematis viticella that has blue bell-shaped flowers.

Containers dressed for fall.


Piper's favourite lookout spot is the little bridge.
My final project for the year is to lay a brick path between the bridge and the arbour you see in the distance.

Here's hoping the temperatures remain warm enough for me to get the pathway completed!

Bookmark this post with a PIN.


