
 The recovered peony with lots of flower buds and the
damaged peony root from a couple of years ago.
The recovered peony with lots of flower buds and the
damaged peony root from a couple of years ago.

Long-lived perennials that don't require routine division
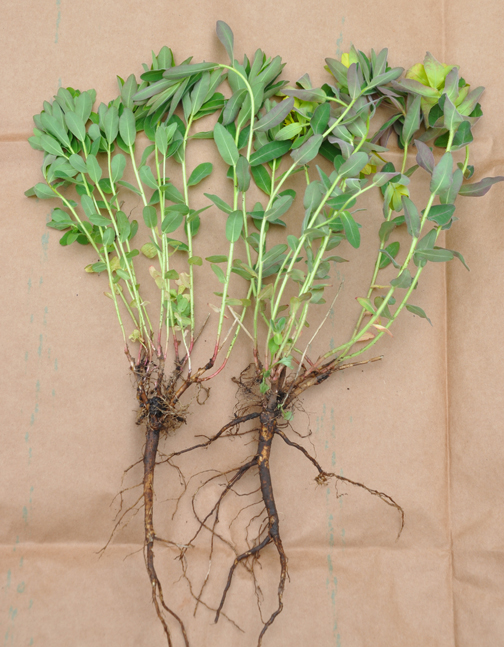
There is a children's game where a secret is whispered around a circle. By the time that whisper makes its way all-around to the end, the tale has usually morphed into something completely different. I sometimes wonder if that what's happened to the advice about moving peonies. I have always heard that they don't like to be moved. In reality, I think they are just very difficult to move successfully.
Peonies are long-lived and their roots run deep. They don't require routine division and it's not an easy task to dig them up. I speak from experience here. Two years ago I moved a white peony. Some of the long finger-like roots broke off in the struggle to lift the plant (see above right). It took a full season for the peony to recover, but this spring there are lots of flower buds (see left above).
 This is what the peony looks like in flower.

Like peonies, there are some long-lived perennials that are quite happy to stay in one spot and do not require regular division. Here are a few examples:
• Gas Plant, Dictamnus (above left) is slow to grow and has a long taproot. The plant in my front garden has been there for over 10 years and has never been divided. Its deep roots also make it hard to move.
• False Indigo, Baptisia (above right) is another long-lived perennial that doesn't require routine division. It too has a taproot that makes it a challenge to lift and transplant.
• Hellebores take years to get really established, so they don't require routine division. It is, however, possible to divide them to make more plants.
• Monkshood, Aconitum is another long-lived perennial that doesn't like to be moved.

There is a children's game where a secret is whispered around a circle. By the time that whisper makes its way all-around to the end, the tale has usually morphed into something completely different. I sometimes wonder if that what's happened to the advice about moving peonies. I have always heard that they don't like to be moved. In reality, I think they are just very difficult to move successfully.
Peonies are long-lived and their roots run deep. They don't require routine division and it's not an easy task to dig them up. I speak from experience here. Two years ago I moved a white peony. Some of the long finger-like roots broke off in the struggle to lift the plant (see above right). It took a full season for the peony to recover, but this spring there are lots of flower buds (see left above).
This is what the peony looks like in flower.
• Gas Plant, Dictamnus (above left) is slow to grow and has a long taproot. The plant in my front garden has been there for over 10 years and has never been divided. Its deep roots also make it hard to move.
• False Indigo, Baptisia (above right) is another long-lived perennial that doesn't require routine division. It too has a taproot that makes it a challenge to lift and transplant.
• Hellebores take years to get really established, so they don't require routine division. It is, however, possible to divide them to make more plants.
• Monkshood, Aconitum is another long-lived perennial that doesn't like to be moved.
• Hellebores take years to get really established, so they don't require routine division. It is, however, possible to divide them to make more plants.
• Monkshood, Aconitum is another long-lived perennial that doesn't like to be moved.

How often should you divide a perennial?
A plant that needs division will usually show signs that it requires attention. Small leaves, fewer flowers or a bare patch surrounded by a ring of fresh growth are sure signs that a perennial needs division. Cutting a big clump into smaller pieces always feels a bit brutal, but the rewards are great. Dividing mature perennials always encourages fresh new growth.
That you like a particular plant and want more of it is one of the other reasons you may want to divide a perennial.
Before you begin: Know your Roots
Perennials that form a fibrous root ball (hosta is one example) or a clump that grows from a single crown are easy to divide.

Offsets
Sometimes a perennial will even develop small offsets that can be separated from the main crown. This is the case with the Betony you see above. The original mother (seen on the right) is the plant with the largest clump of leaves.
Taproots
Euphorbias, Lupins, Columbine (Aquilegia) and Balloon Flower (Platycodon grandiflorus) are a few of the perennials that have carrot-like taproots that make them unsuitable for regular root division. This long tap root also makes it hard to move them (often the root tip will break off), but it is possible to do so.
Euphorbia

Balloon Flower

Butterfly Weed, Asclepias tuberosa (right) is yet another plant with a deep taproot. They prefer not to be moved, lifted or divided but are easy to grow from seeds.
Bleeding Heart, Dicentra has a soft woody-looking taproot that breaks easily.

If you do move these type of plants, try to do so when they're seedlings. It's so much easier and your odds for success are much higher.
In the case of some plants with a taproot, root cuttings are an alternative to regular division. To make a root cutting slice down the taproot ensuring that each division as at least one eye, a piece of the taproot and some of the side feeder roots.
In some cases (Columbines and Lupins are two examples), it is easy to grow new plants from seed.

The roots of some perennials like Bee Balm, Monarda sit just under the surface of the soil. Their roots run through the ground and make new crowns when they reach an open space. A root segment that comes in contact with soil can also produce a new plant.

Russian Sage, Perovskia atriplicifolia has a woody root that runs deep into the ground. It will require an equally deep hole when you transplant it.

Goat's Beard, Aruncus dioicus (left) is a great shade plant that has a deep woody taproot that prefers to be left undisturbed.
Other Perennials with woody roots include Lavender, Rosemary, and Candytuft, Iberis sempervirens.

Some perennials, like hardy Geraniums, spread by underground running roots that produce new suckers that take root and grow. I find that hardy Geraniums complain by drooping when you move them, but recover when given proper care. Move them first thing in the spring, after they flower or in the fall.

Bleeding Heart, Dicentra has a soft woody-looking taproot that breaks easily.
The deep root of a mature Lupin (left) and the much smaller roots of some seedlings (right).
In the case of some plants with a taproot, root cuttings are an alternative to regular division. To make a root cutting slice down the taproot ensuring that each division as at least one eye, a piece of the taproot and some of the side feeder roots.
In some cases (Columbines and Lupins are two examples), it is easy to grow new plants from seed.
Surface Roots
The roots of some perennials like Bee Balm, Monarda sit just under the surface of the soil. Their roots run through the ground and make new crowns when they reach an open space. A root segment that comes in contact with soil can also produce a new plant.
Woody Roots

Other Perennials with woody roots include Lavender, Rosemary, and Candytuft, Iberis sempervirens.
Running Roots
Some perennials, like hardy Geraniums, spread by underground running roots that produce new suckers that take root and grow. I find that hardy Geraniums complain by drooping when you move them, but recover when given proper care. Move them first thing in the spring, after they flower or in the fall.
Rhizomes and Tubers
Perennials like Bearded Irises have tubers that can be divided with a sharp knife. Dahlias are a good example of a flower grown from a tuber. Again create a division by cutting the tuber with a knife.
Here's a Summary List of Perennials Best not Divided
Balloon Flower, Platycodon grandiflorus
Bleeding Heart, Dicentra
Butterfly Weed, Asclepias tuberosa
Columbine, Aquilegia
Delphinium
False Indigo, Baptisia
Gas Plant, Dictamnus
Geraniums, Pelargonium
Goat's Beard, Aruncus dioicus
Hellebore, Helleborus
Lavender, Lavandula
Lupin, Lupinus
Monkshood, Aconitum
Peony, Paeonia
Self-seeded plants like Foxgloves, Feverfew, Rose Campion (Lychnis coronaria)
Silvermound, Artemisia
Spurge, Euphorbia
Rosemary, Rosmarinus officinalis
Russian Sage, Perovskia atriplicifolia
Sage, Salvia Officinalis
Sea Holly, Eryngium
Not sure when to move a plant or what kind of roots you are dealing with?
The internet can be quite a handy garden tool! It is fairly easy to research how, when, and if you can move a particular plant.
Moving Perennials
The day before the big move it's a good idea to give your plants a good soak.
Tip: As I wrote in the previous post, the sun can give an uprooted plant a real beating. I always try to move or divide plants on a cloudy day. Even better, I move or divide plants early in the evening just before a day of rain. That extra water and a break from the sun can really help the plant recover.

Tip: If the plant is large, I put aside my smaller everyday shovel and bring out the big guns! A heavy-duty shovel with a long handle will give you the extra leverage that will make the job so much easier.
Using your shovel work in a circle around the perimeter of the plant. Dig the shovel's tip deep into the ground to get as much of the root ball as you can.
Once you have gone in a full circle around the plant, go around a second time slowly prying upward. Set the lifted plant in the shade while you prepare a new hole.

Dig a hole that is wider and deeper than the root ball. Place the plant into its new home and backfill with the excavated earth. To remove any air pockets, firm down the soil around the plant with your foot.
Tip: Rather than digging down and piling the excavated soil around the outer rim of my hole, I like to fill an empty pot with dirt. I find it is easier to pour the dirt from a pot to refill the hole than it is to rake the dirt back into place.
Give your newly transplanted perennial a good drink. Continue to water daily until it shows clear signs of recovery.
Dividing a Perennial

I like to make divisions as soon as there are signs of growth in the spring. In the case of a hosta, I will usually get to work the moment the tight cones of curled up foliage emerges from the warming ground. I let the plant be my guide and place the tip of my shovel accordingly. Depending on its size, I slice the hosta into two or more pieces. Finally, I dig up and replant the divisions.
Things get trickier the more the hosta's foliage opens. The risk of damaging the leaves is very high. Additionally, the more mature the plant, the more likely you are going to run into firm resistance when you try to sink the tip of the shovel into a dense root ball.
And let's not forget the Herculean effort involved in digging up a huge hosta! So here's what I do with a plant where the foliage has started to open.


This knife is one of Lee Valley's Premium Series of garden tools (for those of you in the USA here is a link to the American site for Lee Valley and the knife). They offer a number of garden knives, but I liked this one the best because of the comfortable handle and the single-sided blade.
Let me show you how to use this knife with another plant.

I could take cuttings and make more plants, but it would take time for them to grow and mature. I'm impatient to add this sedum to one of my new flowerbeds and division will give me the biggest plant in the least amount of time.

This plant is three or four years old, so the rootball is fairly substantial. I dug up the plant and placed it on its side. (I am working here on some brown paper to make the process easier to see and to keep things tidy.)
Tip: One way to lessen the possibility of damaging the foliage is to wrap the plant stems together with some twine. If you're are working in the fall, you can cut back the foliage before digging out a plant to be divided.
Tip: One way to lessen the possibility of damaging the foliage is to wrap the plant stems together with some twine. If you're are working in the fall, you can cut back the foliage before digging out a plant to be divided.

I took my new knife, with its saw-tooth edge, and placed it at the base of the foliage.

Then I sawed my way down through the rootball.

Tip: Only keep and replant the healthiest sections of any plant you're dividing. Discard any sections that are weak, were part of a dead centre or show evidence of a pest problem.

One of the two divisions newly planted.
You will end up with divisions that have a flat side where the cut was made. Don't worry! When you plant the pieces, simply place the flat side facing into the flowerbed. No one but you will ever know that it's there and the plant will round out very quickly.

Always water a plant thoroughly after you move or divide it. Until it shows signs of recovery, routinely water it, especially if the weather is dry.
Is there a cut-off date for moving or dividing plants in the spring?
I wouldn't say there is a fixed date after which you shouldn't move or divide plants. The date may vary year to year. Weather should be the determining factor in making your decision to proceed. Heat and sun can brutalize a plant that has been uprooted.
We have a couple of days of intermittent rain in the forecast here, so the race was on to get all the perennials I plan to move or divide settled into their new homes before the heat arrived. Spring has been downright cold this year, giving me extra time to shift things around, but hotter weather is quickly moving in.
Once the days are warm, it is much better to wait for early autumn or the following spring.

What happens if you move a plant in the heat of summer?
You won't necessarily kill your plant, but you may live to regret your decision. A plant that has been moved at the wrong time can look horrible for the rest of that gardening season and may even take a second year to fully recover.
If you're absolutely stuck and have to move something after the heat arrives, here are a few tips:
• Time the move to take place on an overcast or rainy day
• Avoid uprooting a plant mid-day. Instead, try to get the job done in the early evening.
• Water immediately after planting and continue to supply regular water during the plant's period of recovery.
• Remove any flowers and enjoy them in a vase. Cut back the foliage, as best you can, so the plant can focus its energies on growing new roots.
• Create temporary shade to help the plant through those first few days. To do this prop up a piece of cardboard or plywood so that it blocks the plant from the sun in the hottest part of the day.

Baptisia
Collateral Damage
In the previous post, I mentioned that I moved a Baptisia from the front to the back garden earlier in the spring. A few pieces broke off from the main rootball, so I planted them up in a pot. In the fall, I will try to find them a permanent home.


When I was dividing the hosta, a few small pieces were caught in the crossfire.
Even tiny pieces of a plant can sometimes have little root hairs. Right after I took the picture of them lined up on the paper, I placed them all in a plastic cup with an inch or two of water. The following morning I potted them up. You can cut the larger leaves in half to improve the odds that they will take root, but I like to live on the edge and left them full size. If I keep them watered and out of direct sunlight, I expect most of them will take.
I have a few pieces of Sedum 'Autumn Charm' that I hope to do the same with. The way I look at it, I have nothing to lose and everything to gain.

Disclaimer: After considering many knife options, and finally selecting the Sod knife shown above, I approached Lee Valley Tools. They were kind enough to supply me with a knife.
I have a few pieces of Sedum 'Autumn Charm' that I hope to do the same with. The way I look at it, I have nothing to lose and everything to gain.
Bookmark this post with a PIN.
Excellent information! Thank you for sharing.
ReplyDelete